IndiCam Service
Overview
The IndiCam service extracts measurements from images of mechanical oil gauges, using Machine Learning.
BETA NOTICE: This service is in Beta, and is best suited for early adopters with some technical skills, and patience. The Machine Learning model may need to be extended to deal with specific Oil Gauges, so expect a high error rate for the first several days of running the system. See Training the Machine Learning System for details.
To use the service, do the following:
- Create an account and get an API key -- see the App Site section.
- Set up a camera to capture an image of the oil tank gauge. A low-cost ESP32-CAM with ESPHome on it is a great solution for this.
- Either configure the client on a Home Assistant device, or, write code to directly access the service via the API. See below how to do these.
Privacy concerns
During the Beta phase, the Machine Learning is expected to make mistakes and fail, with failures diminishing over time. In order to facilitate communication during this learning ramp-up, uploaded gauge images are associated with user accounts.
To better fit with Home Assistant's goal of keeping data under the control of its owner, the following will be implemented after the beta is complete:
- When images are stored, store them without any reference to the account they originated from;
- Remove existing references between user accounts and images;
- Allow users to opt out of having their images stored, once their gauge is being processed correctly;
- And, implement ML measurement extraction on the Home Assistant system itself, or (perhaps) the camera device, so images need not be passed to the online service.
Capturing Oil Gauge Images
A still or video camera must be used to capture an image of the oil tank gauge. The minimum capture cycle for slow-changing oil tank gauges is an hour, so the video camera is essentially used as a still camera. The gauge image must:
- Fit into the camera frame, including its top and base.
- Ideally occupy more than 75% of the image height.
- Be oriented right way up in the image, close to vertical -- i.e. rotate the device so that the image is upright.
In order to minimize spatial distortion, the camera must: 1. Point directly at the center of the gauge, so the top and bottom are equidistant from the camera lens. 2. Face the gauge squarely, i.e. the lens must be parallel to the gauge.
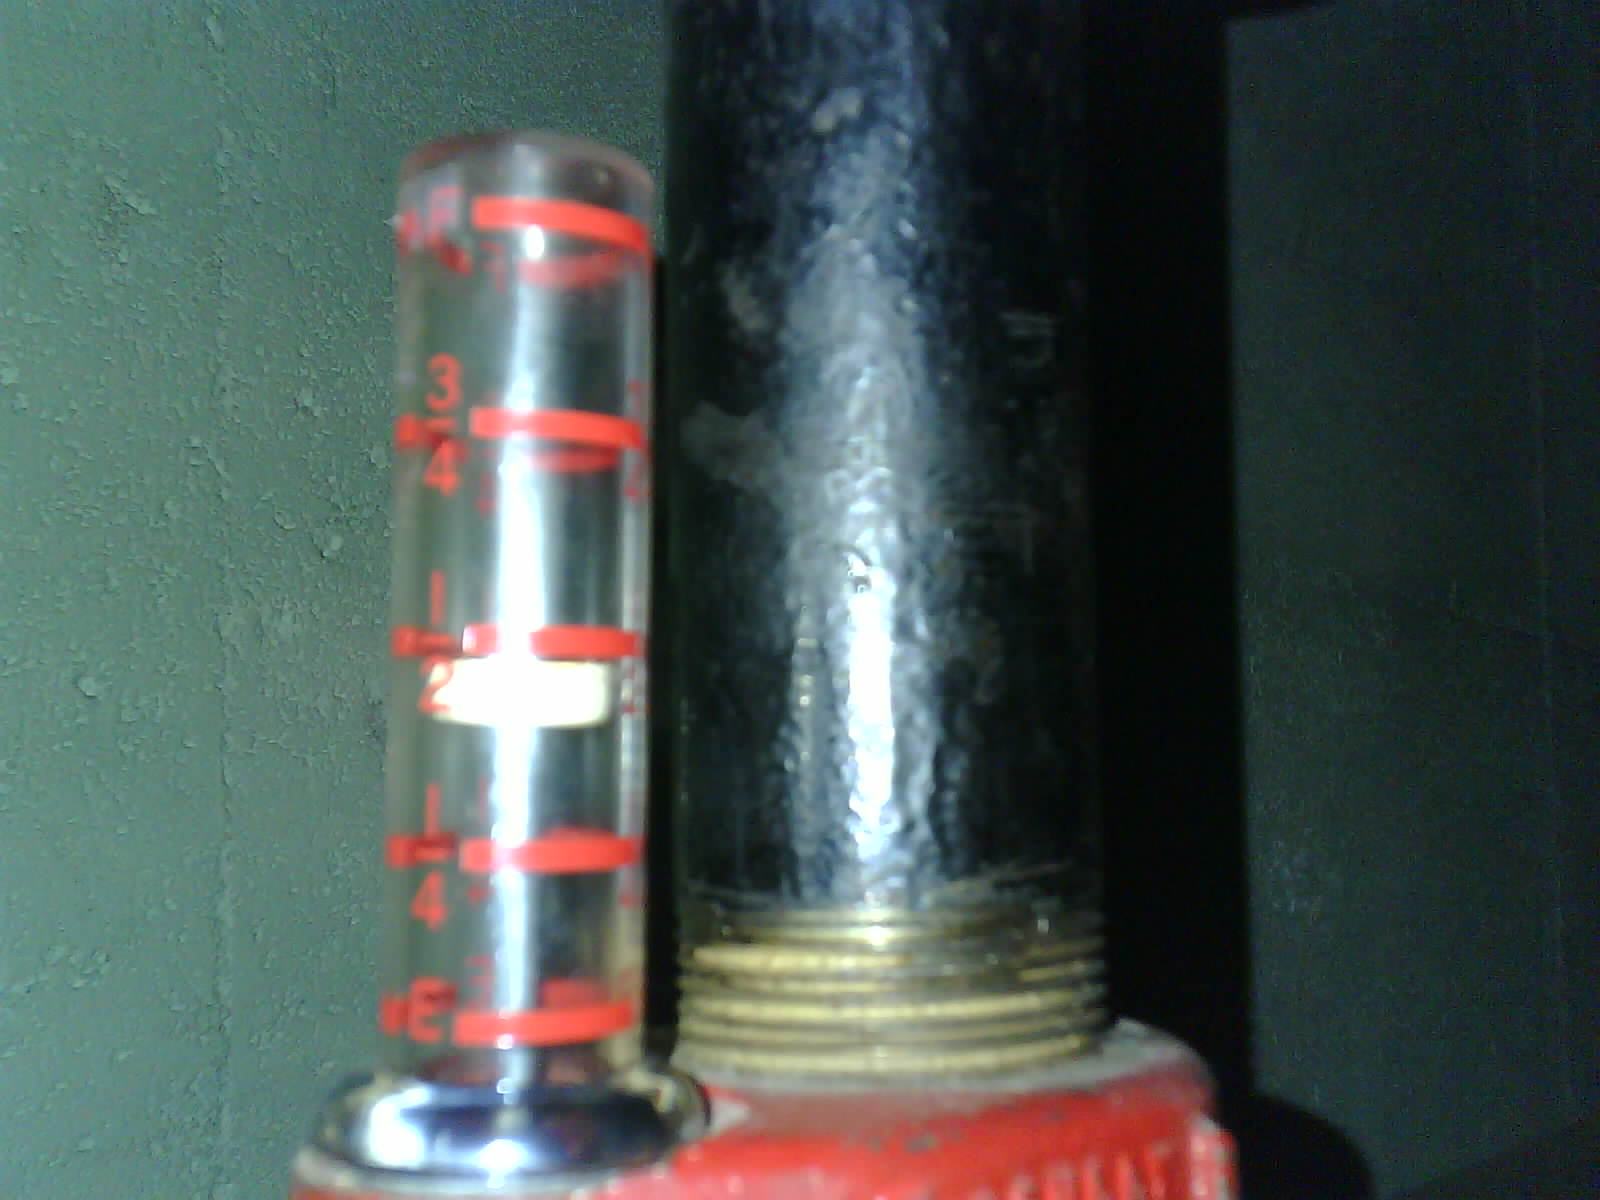
This is an example of an image conforming to the specification, taken with an ESP32-CAM using the LED flash in a poorly lit basement:
Service Clients
Home Assistant Custom Component
Notes on Camera and Flash Entities
Assuming an ESPHome-based camera as described here, after the camera has been detected and the device integration added by the user, the following entities will be created:
camera.indicator_camera-- The camera entity IDswitch.camera_flash-- The flash LED entity ID
Note that using a different camera, a different ESPHome configuration, or a different lighting solution means the entity ID's should be replaced in the example configuration below. The flash setup is optional.
Install the Integration
A Home Assistant Custom Component exists to integrate the IndiCam service with a Home Assistant installation. Currently, the component is available via a custom HACS repository.
This requires the installation of HACS first, and then after rebooting, adding the custom repository using HACS.
Note that the installation of HACS requires a reboot. Installation of the integration requires another reboot, which can be delayed until after the configuration in the next section has been done.
Configure the Indicam Sensor Platform
Add the following sections to your Home Assistant's configuration.yaml. First set up the
client API key in the secrets.yaml file in the config directory. You'll need the
service client api key for this.
# config/secrets.yaml

# Just a placeholder, replace with your own key
indicam_client_key: 1234abcdef5678...
In order for the Home Assistant system to save the captured image and the "decorated image"
that shows the measurement results, allow reading and writing files to a selected location
on disk (/tmp in this case, see the docs for more info)
# config/configuration.yaml

homeassistant:
  # Give access to the directory image files will be written to. This is optional if the "file_out" item
  # in the next section is not used.
  allowlist_external_dirs:
    - /tmp
Configure the integration, which requires the API key in secrets.yaml, and (optionally) define a path within the
allowlist_external_dirs defined above to save images:
# config/configuration.yaml

indicam:
  client_api_key: !secret indicam_client_key
  path_out: "/tmp/indicam"
Finally, configure the sensor using the indicam platform:
# config/configuration.yaml

sensor:
- platform: indicam
  name: Oil Tank Fill Level
  service_device: test_hass2
  camera_entity_id: camera.indicator_camera
  flash_entity_id: switch.oil_tank_camera_flash
  sensor_type: vertical_float
  # Decimal fraction of body height of max and min measurement lines,
  # from top and bottom of gauge body, respectively.
  maximum: 0.07
  minimum: 0.07
  scan_interval: "04:00"
The configuration values for the sensor are:
platform: Must be "indicam". Required.- 'name': The name of the Sensor, used to identify it in Home Assistant. Required.
service_device: The name of the indicam device at the service. Required.camera_entity_id: The camera's entity ID, so that snapshots can be acquired. Required.flash_entity_id: A switch controlling a flash (e.g. the on-board LED on an ESP32CAM). Optional.sensor_type: Must be "vertical_float" for now -- a typical oil tank float sensor. Required.maximum: The location of the 100% mark, as a fraction of the gauge height, relative to the top of the bell. Optional, 0 is the default.minimum: The location of the 0% mark, as a fraction of the gauge height, relative to the bottom of the bell. Optional, 0 is the default.scan_interval: The time between sensor updates. Optional, with 4 hours the default. Minimum is 1 hour.
Processed Image Display
Both the source image and a version of it that is decorated with the elements detected by the image processing algorithm can be displayed in the Home Assistant UI.
The images are saved at processing time in the directory specified in the path_out option
(see above). Assuming /tmp/indicam as the path_out directory, two files are created:
/tmp/indicam/[indicam-name]-snapshot.jpg: The snapshot taken for processing./tmp/indicam/[indicam-name]-measure.jpg: A version of the snapshot decorated with measurement elements.
[indicam-name] is replaced with the device name at the service.
The images can be displayed with the help of a Local File camera, using the paths above as the image sources. Picture Entity cards can be created from the camera entities and placed on a dashboard.
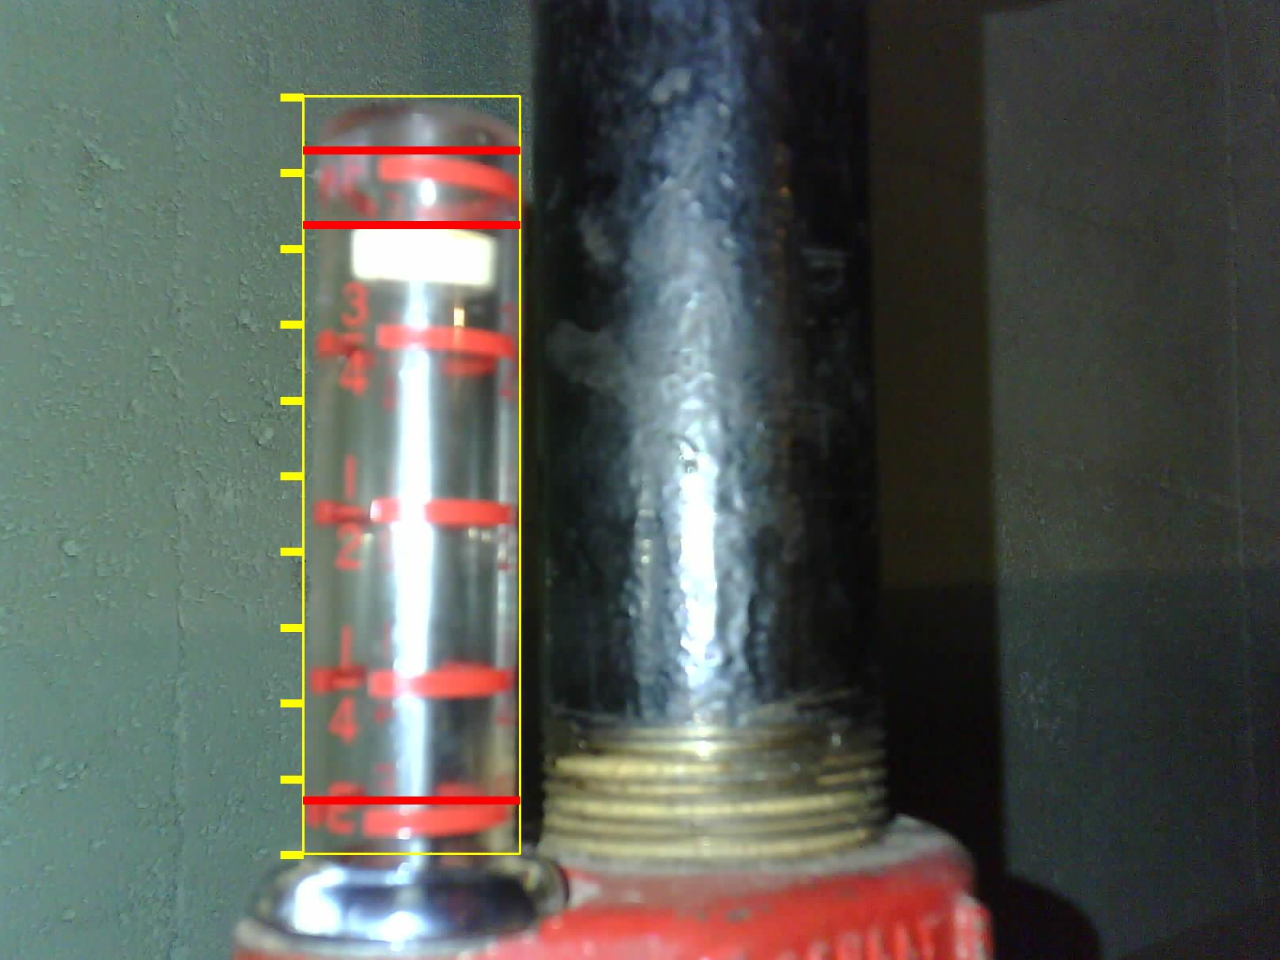
This is an example of a processed (or "decorated") image. Note that:
- The gauge body is outlined in yellow.
- To the left of the body there is a scale evenly dividing the body into ten units. This is useful for calibration of the minimum and maximum level positions (see Calibration).
- The minimum and maximum levels are marked in red.
- The top of the float is marked in red.
IndiCam Client Library
A client library is available to ease the use of the service. It can be installed with:
pip install indicam_client
To instantiate an instance of the client library, pass an aiohttp client session, the service URL, and, an
API key obtained from the Apps Website:
import asyncio
import aiohttp
import indicam_client


API_KEY = "my api key..."
SVC_URL = "https://app.hausnet.io/indicam/api"

async def main():
    """Get a session, then create the client. Test the connection after."""

    session = await aiohttp.ClientSession()
    api_client = indicam_client.IndiCamServiceClient(session, SVC_URL, API_KEY)

    connect_status = await api_client.test_connect()
    if connect_status = indicam_client.CONNECT_OK:
        # Connection made
        ...
    elif connect_status = indicam_client.CONNECT_AUTH_FAIL:
        # Authentication failed -- probably due to the wrong API key.
        ...
    elif connect_status = indicam_client.CONNECT_FAIL:
        # Connection failed, retry is advised
        ...
Now, given a JPEG image of the gauge, it can be uploaded to the service. After the upload, the client system should wait for results to be extracted:
DEVICE_NAME="my_device"
MEASUREMENT_PROCESS_DELAYS = [1, 5, 25, 60, 90]

async def process_image(image: bytes) -> None:
    """Upload a given image. Return 'None' if the upload failed. Then, wait for the result to be ready. """

    image_id = api_client.upload_image(DEVICE_NAME, image)
    if not image_id:
        # Image was not uploaded
        return None
    for delay in MEASUREMENT_PROCESS_DELAYS:
        if not await api_client.measurement_ready(image_id):
            await asyncio.sleep(delay)
            continue
        measurement = await api_client.get_measurement(image_id)
        if not measurement:
            break
        return measurement
    return None
The measurement returned is a GaugeMeasurement, and the values there can be used to decorate the input image
with the edges of the items detected.
class GaugeMeasurement:
    # Position of the left side of the detected gauge body, in pixels from the left side of the image.
    body_left: int
    # Position of the right side of the detected gauge body, in pixels from the left side of the image.
    body_right: int
    # Position of the top of the detected gauge body, in pixels from the top of the image.
    body_top: int
    # Position of the bottom of the detected gauge body, in pixels from the top of the image.
    body_bottom: int
    # The position of the top of the float, in pixels from the top of the image.
    float_top: int
    # The % full value, between 0% and 100% (or 0 to 1). Takes the camera config (calibration) into account.
    value: float
On the very first connection, the virtual device at the service has a default camera configuration (i.e. calibration) such that the offset of the full and empty gauge marks from the top and the bottom of the gauge bell is assumed to be zero. The offsets can be calibrated to agree with the actual position of the minimum and maximum marks:
async def update_camconfig(new_config: CamConfig) -> None:
    """Update the IndiCam service with offset calculated to agree with actual min/max marks.

    The offsets are provided as factors of the body height from the top of the gauge or the bottom. First,
    get the numeric indicam ID, using its name, then check the service configuration values -- if they
    agree with the local values, don't update.
    """

    indicam_id = await api_client.get_indicam_id(DEVICE_NAME)
    svc_cfg = await api_client.get_camconfig(indicam_id)
    if not svc_cfg:
        # Handle no service config returned...
        ...

    if svc_cfg == new_config:
        # No need to update
        return

    cfg_created = await api_client.create_camconfig(indicam_id, new_config)
    if not cfg_created:
        # Deal with error
        ...
    return
The CamConfig is defined in the indicam_client module as:
class CamConfig:
    """ Holds the camera configuration. """
    min_perc: float
    max_perc: float
API
Note that the Beta is focusing on the Home Assistant client. More documentation with examples for the API will be provided once that client is working smoothly. That said, let us know if you're trying to use the API and need some guidance.
The API is documented with Swagger. The API documentation can be viewed here.
Authentication is required, and is done via an API key in the request headers. The API key is available via the App Site, and needs to be set in the request header like this:
Authorization: Token 9944b091a9c62bcf9418ad846dd3e4bbdfc6ee4b
In addition to the token, the API requires a device to be defined at the service. This device represents your home automation system at the service, and its name is needed to generate a heartbeat for the actual device.
Training the Machine Learning System
As the Machine Learning (ML) encounters new gauges, they may be sufficiently different from the gauges it has been trained on up to that time. This means the first several days worth of images may fail
There is a system in place where, if an image measurement extraction fails, a human will examine a failed measurement image, and extend the training of the ML system. Within a short period of time, the system should start recognizing the new gauge, and errors will become fewer until they're rare.
Measurement Calibration
The machine learning algorithm detects the body outline of the oil gauge. The float minimum and maximum marks on the gauge body are the real fill minimum and maximum, and respectively lie above and below the gauge body bottom and top.
By default, the gauge body is used as the minimum and maximum reference when calculating the fill level as a percentage. To make the measurements more accurate, the locations of the minimum and maximum fill level marks can be defined relative to the body.
The fill line minimum and maximum can be defined in the configuration.
with the maximum and minimum settings. Both settings are defined as a factor, or a percentage, of the body
height. And the length obtained by multiplying the gauge body height with the setting value gives the distance
of the setting value from the body bottom or top.
For example, using settings of 0.05 (5%) for minimum and 0.1 (10%) for maximum, and a body height of 186 pixels, and assuming the image pixel row numbers start at zero from the image top and increase towards the bottom:
# Minimum line offset in pixels from bottom
pixel_offset_min = round(186 * 0.05)            # = 9
# Maximum line offset in pixels from top
pixel_offset_max = round(186 * 0.1)             # = 19
# Line locations in pixels from top of image, assuming body top is at 132 pixels from top of image
pixel_loc_min = (132 + 186) - pixel_offset_min  # = 309
pixel_loc_max = 132 + pixel_offset_max          # = 151

# And how the measurement is calculated, assuming the float top is at 80% of the gauge body, at pixel row
# 132 + round(186*(1-0.8)) = 169.The measurement is in percentage / factor of the distance between the minimum
# and the maximum.
measurement = abs(169 - pixel_loc_min) / abs(pixel_loc_max - pixel_loc_min) # = 0.88
So in this example, the calibrated measurement is 88%, compared to 80% for the uncalibrated.
When displaying the decorated image in Home Assistant, a scale is displayed to the left of the gauge body, dividing the body into ten parts. The scale can be used to estimate the offset percentages visually. Also, the positions of the current minimum and maximum are displayed by red lines, and these lines, together with the scale and the current setting values, can be used to fine-tune the settings.
When changing the settings, a restart of Home Assistant is needed for the new settings to take effect.
Using an ESP32-CAM
Any video camera should be suitable for capture. Here we provide implementation notes for the ESP32-CAM, since it is popular, affordable, flexible, and, easily integrated with the Home Assistant + ESPHome platforms.
The ESP32-CAM module contains a wi-fi enabled ESP32 processor and an OV2640 camera chip, for under $10. Combined with a development carrier board (ESP32-CAM-MB) that contains a power supply, serial communications, and reset / programming buttons, it makes an effective and very affordable camera for this application.
The first step to use this camera is to program it with the ESPHome firmware. The ESPHome website contains instructions for programming the firmware. Here is the configuration for a bare-bones camera:
esphome:
  name: indicam
  comment: Indicator camera on ESP32CAM.
  platformio_options:
    # Looks like this is needed for build outside a Home Assistant environment.
    build_flags:
      - "-DCONFIG_OV2640_SUPPORT"
      - "-DCONFIG_SCCB_HARDWARE_I2C"
      #- "-DCONFIG_SCCB_HARDWARE_I2C_PORT1"
      #- "-DCONFIG_SCCB_CLK_FREQ=100000"

esp32:
  board: esp32cam
  framework:
    type: esp-idf
    version: recommended

# Enable logging
logger:
  level: DEBUG

# Enable Home Assistant API
api:
  password: ""

ota:
  password: ""

wifi:
  ssid: !secret wifi_ssid
  password: !secret wifi_password

switch:
  - platform: gpio
    pin: GPIO4
    name: "Camera Flash"

i2c:
  sda: 26
  scl: 27
  scan: false
  frequency: 100kHz

# For the AI-Thinker board, using this as a guide:
#   https://sequr.be/blog/2021/03/esp32-cam-and-esphome/
esp32_camera:
  name: Indicator Camera
  external_clock:
    pin: GPIO0
    frequency: 10MHz
  i2c_pins:
    sda: GPIO26
    scl: GPIO27
  data_pins: [GPIO5, GPIO18, GPIO19, GPIO21, GPIO36, GPIO39, GPIO34, GPIO35]
  vsync_pin: GPIO25
  href_pin: GPIO23
  pixel_clock_pin: GPIO22
  power_down_pin: GPIO32
  # Image settings
  #max_framerate: 1 fps
  idle_framerate: 0 fps
  resolution: 1600x1200
  jpeg_quality: 10
Notes:
- The
idle_framerateis set to 0, meaning no frames will be captured until a request is made from the Home Assistant controller. - The use of the LED Flash on the ESP32-CAM is optional, and it can be left off if adequate ambient light exists, or, if another solution is used for lighting.
Configuration for ESP32-based boards other than the ESP32-CAM can be found in the ESPHome ESP32 Camera Documentation